Sunday, December 9, 2012

Same scene... different result! Smoky Mountains of Tennessee...

Who knows where the time goes... a little something different today... a fall scene from the Smoky Mountains of Tennessee with two images from the same location. One image was shot with my big girl camera (Nikon D7000 with 18-200mm Nikon lens; aperture priority) and one with my iPhone 4s native camera in HDR mode. Both were processed further, the big girl image post processing was done in Lightroom, Viveza 2 and Color Efex Pro 4. The iPhone image post processing is covered on my iPhone blog.

First, the "big girl" camera image:
fall in the Smoky Mountains; Nikon D7000
Second, the iPhone camera image:
retro filter applied

The two images have a completely different feel to them... I like them both for different reasons. One of the most wonderful things I've discovered in taking tours with John Barclay and Dan Sniffin (marvelous tour leaders) is how much fun it is to play around with the original image to enhance the beauty of what my eye sees. Their tours always involve scouting on their part before we arrive in the area so we are assured that they will be taking us to scenes such as this one.

Friday, September 21, 2012

Long time... no posts! An image from Ireland...

I cannot believe I have neglected this blog for such a long time. I confess to having become totally enamored with iPhone photography and iOS apps used to edit those images. Although I've continued to take photos with my "big girl" camera, I have spent a lot more time lately with my iPhone images and do most of my editing of those on an iPad 2.

Recently, I tried editing an SLR image on my iPad using several different iOS apps after doing some preliminary editing of the image in Lightroom and other desktop apps/plugins. I am going to share two images here (and on Weekly Top Shots) and elaborate the process further on my iPhone blog. The image that served as the starting point for this exercise was an HDR image assembled with Nik HDR Efex Pro from 3 images shot at ISO 400, f/14 with a Nikon D7000/18-200mm lens.

cloudy sky over farm fields
I played around with the above image (on my computer) using a couple different Topaz plug-ins and tried also (using Content Aware) to remove the phone wires in Photoshop. But my skill set didn't allow me to achieve the results I wanted so I moved the image to my iPad and continued the processing there to achieve the final result shown below. The processing steps to achieve this result are posted on my iPhone blog.

TAG

Sunday, April 1, 2012

Announcing a new blog...

I've decided it is time to separate my iPhone photography passion out from this blog and have started a new blog to discuss how I achieved (as my first post) the following image. :-)

collage of images as described
Title: Better Energy as seen through a steamy window in Manhattan (note, if you go to my other blog, you will discover that the effects were achieved through the magic of various iPhone photography apps and that the original image was not taken through a steamy window)

As a bonus, here is another image of two Camellias (both growing on the SAME bush in my garden). Again, this was done with several iPhone apps which I may discuss in a later post but am anxious to get up here since it has been SO LONG since I've posted on Macro Monday over at Lisa's Chaos... I'll be posting this later over there... come on over and join the fun!.

collage of images as described

I'm off on another trip shortly but will be trying, once again, to catch up with blogs. I've been sick with bronchitis for over two weeks and am only now starting to feel human again... just in time to head off on another adventure!

Monday, February 20, 2012

Macro images collage... alternative to Picnik?

By now, I'm guessing anyone who uses Picnik to make collages of their images is wondering, as I am, what to do when Picnik disappears. I personally am in a bit of a panic because I really don't want to have to reinvent the process I've been using to assemble collages for my vacation blog as well as for this one.

In the process of searching for an alternative, I came across an app for the iPhone and iPad called Diptic... this collage was made with that app which, of course, required me to transfer images from my computer to my iPad (Transfer app) so I could assemble the collage. Since there is an app called Web Albums (for both iPad and iPhone) that allows one to transfer images to Picasa (where I store my photos that I will use for blogs), I was then able to transfer the collage for insertion below. (NOTE that all the images in the collage were captured with a Nikon D90 fitted with a 105mm Nikon macro lens. I only used the iPad to assemble the collage with Diptic.) Posted to Macro Monday over at Lisa's Chaos... come on over and join the fun!

collage of images as described

Thursday, February 16, 2012

Colorado iPhone Image - The answer to how it was done...

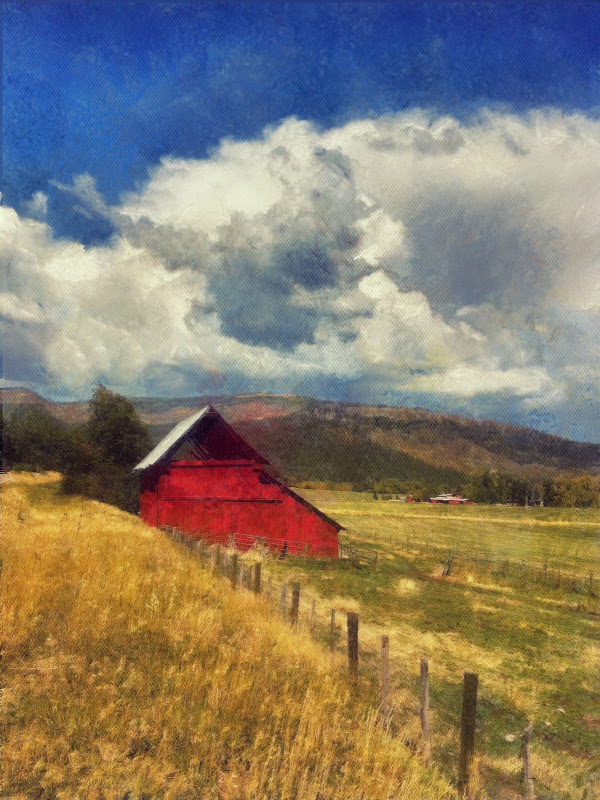
I don't pretend to be an expert at using iPhone apps for photo enhancement. But I do have one image that seems to be quite popular and can actually recall every step I did to get the end result. I'll explain the entire process in this post. At the end, two alternative results of post processing are shown as well as an image taken with Hipstamatic and presented 'as is' with no post processing. This post is especially for those who've inquired about the process involved in processing this image. (Oh, and this is my first post for Skywatch Friday and Weekly Top Shot.)

BracketMode dark imageBracketMode light image
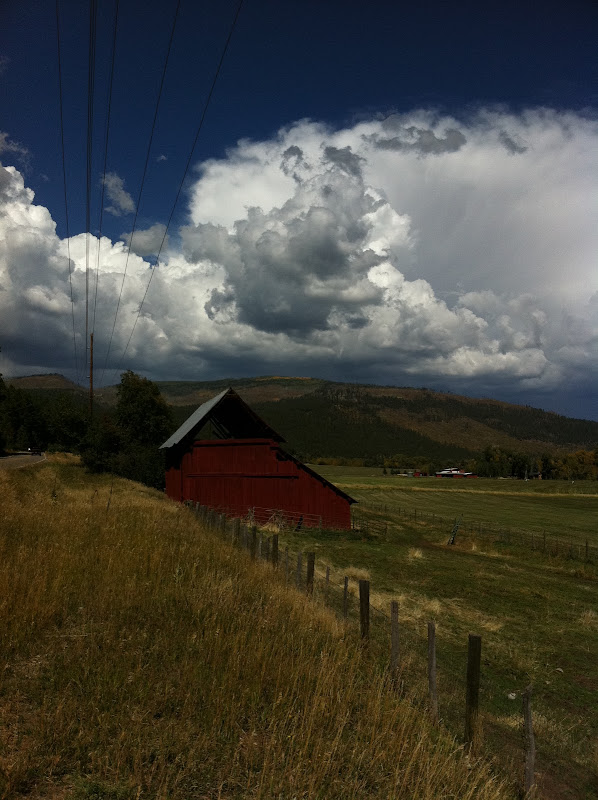
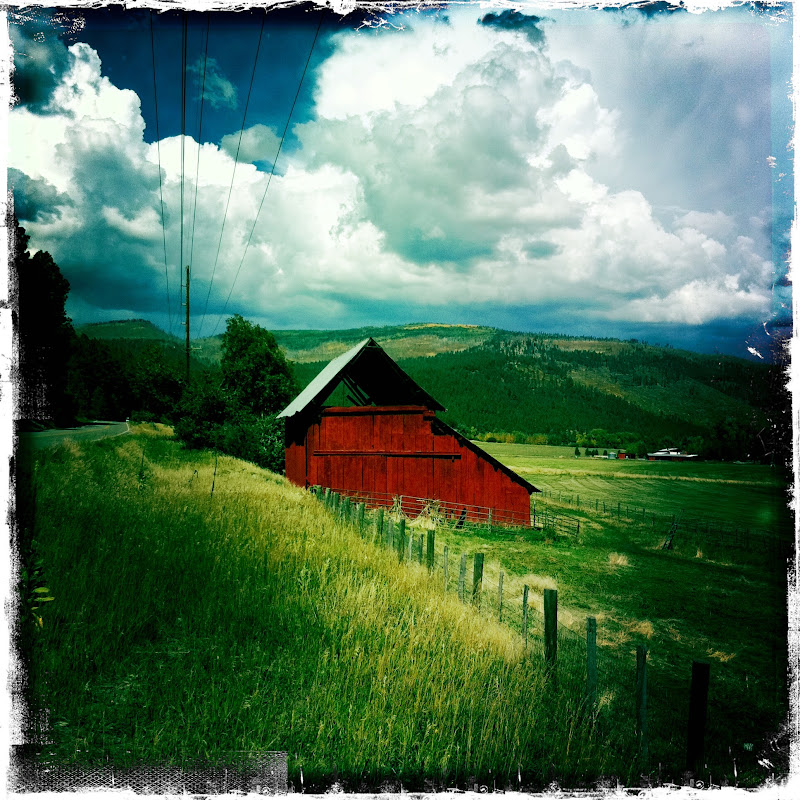
Two images captured in BracketMode on the iPhone; I chased clouds for miles in an attempt to find scenery worthy of the sky... the red barn and rolling fields did it for me!

BracketMode images blendedblended image retouched to remove telephone pole and wires
On the left is the HDR image obtained from merging the two BracketMode images using the Pro HDR app; on the right is the retouched image shown after removing the telephone pole and overhead wires with the Touch/Retouch app. (The two images shown at the end were those achieved by continuing with subsequent processing from starting with the left image OR the right image. Regardless of which image was the starting point, the steps shown from here forward were the same.

Benson effect, AutoPainter applied to imageAutoPainter image merged with Pro HDR image
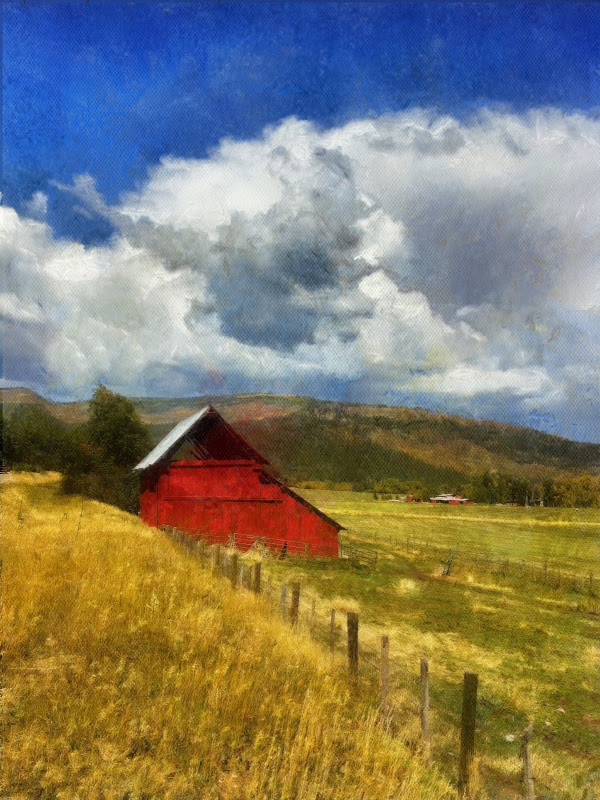
The image on the left shows the top right image in the previous set of images after it has been processed through AutoPainter with the Benson effect applied. The image on the right is the previous two images blended in Iris with the retouched original HDR image set as the base layer and the Benson effect image blended at 50%. Setting the original as the base layer allows one to keep the high resolution of the original image in the resultant image. No masking was used.

reduced saturation imageTAG
The image on the left shows the previous image slightly desaturated and the one on the right is cropped to achieve a more pleasing composition, to my eye anyway!

colorado roadside sceneHipstamatic image
On the left, is the same image as the previous without removing the telephone pole and overhead wires; on the right is an un-retouched image shot with Kodot film and the John S lens of the Hipstamatic app.

Tuesday, February 14, 2012

Happy Valentine's Day!

Browsing around Flickr and Facebook today, I noticed people posting about Valentine's Day which I had tried to ignore this year since I'm newly single (by choice). So it occurred to me that even though I'm not "in a relationship" with a significant other, I am rich in friends and have a lot of love in my life.

So I decided to try to put together a photo that spoke a bit about love anyway. For years, I've collected tiny boxes of various shapes and sizes. Quite a few of them are heart shaped... so I put together a still life with a few of them and some solid tiny glass hearts, a few tiny silver hearts, and a few foreign coins strewn on a velveteen cloth.

collage of images as described
This photo was taken using BracketMode on my iPhone. For those unfamiliar with iPhone photography, BracketMode takes two exposures, one exposed correctly for the bright areas in the scene, and one exposed correctly for the dark areas. Pro HDR was used to merge the two exposures into a single image which was then processed through Painteresque to create a painterly feel. Iris was used to blend the painted image (at 65% opacity) with the merged single image. I then continued to process the image in Iris by adding the Normal Grunge effect and the Grunge frame (in the Dust 'n Scratches effect). The text and the heart surrounding "love" was added using A+ Signature which is a mind boggling app for adding text and simple images.

Monday, January 23, 2012

Winter macros - inside and outside...

On a particularly nasty day, I gave my new iPhone macro lens (part of an "Olloclip" set of three lenses for iPhone) a try and photographed an Alstroemeria blossom up close and personal.

Alstroemeria blossom close-up
A couple of days later, I ventured outdoors to capture some icy, snowy macro images in my garden since the snowy mix we'd had earlier in the week hadn't melted due to two days running of cold temperatures. Clockwise from top left below: Rosemary, Camellia in bud, Vinca covered with ice and snow and a faded Hydrangea blossom encased in an ice and snow mix.

collage of images as described
I'm posting this to Macro Monday over at Lisa's Chaos... come on over and join the fun!